How to Grow a Rose From Your Wedding Bouquet (step-by-step)
Amazingly enough, there is a way to preserve the roses in your wedding bouquet, in the form of a beautiful rose plant. It’s also an incredibly easy way to make your yard or garden look beautiful, with an interesting story to tell!
Although it’s not a particularly straightforward or easy process, a rose can indeed be propagated from any bouquet you choose. Whether you want to grow a rose from your wedding bouquet, or you want to save one from your Mother’s day bunch – you can grow a brand new rose plant through a process called “cloning”.
Cloning takes a preexisting cut rose and encourages it to develop roots from the end of the stem, which ends with the rose becoming a “full plant” capable of growth and sustaining itself.
Table of Contents
What Do I Need To Grow A Rose From My Wedding Bouquet?
Choose a rose that is in full bloom, healthy, and with no visible signs of fluffy ends (decay / rot) or that feels squashy which can indicate the rose is going bad.
- Rose from your wedding bouquet
- Sharp, clean shears
- Hole puncher
- Container/s, non-transparent, deep
- Small container for rooting hormone
- Tap water
- Pencil or small gardening stick
- Perlite or other starter
- Rooting hormone (Rootone)
- Transparent blanket bag or transparent plastic bags
Rooting happens from the stem and not the entire stem can root, which makes preparing the stem properly for propagating crucial. Newer growth, which is the flower head, cannot root, and neither can the older growth, which is the completely stiff, wooden part at the very end of the rose.
Preparing the stem
- Cut the head of the rose off. A flowerless stem with leaves will remain.
- Take a good look at your stem.
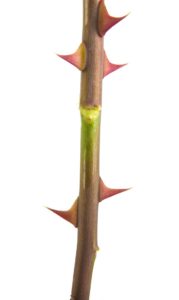
Stems all have branches with leaves on it, and wherever a leaf comes out of the stem, between the stem and the leaf branch there will be a tiny circular aberration called a node. This is where a new growth of the rose will come from.
3. At the very end of the stem, slightly below a node, cut at a 45 degree angle.
It is important to cut the end at an angle to allow it to sink into the material more easily, as well as to avoid water droplets collecting around it and causing rot.
Cut the stem to be 15 to 20 centimetres long in total (6 to 8 inches).
The stiffer part of the stem is of the best quality for propagation. This excludes the soft, bendy part with the rose flower, as well as the wooden, rigid part at the very end.
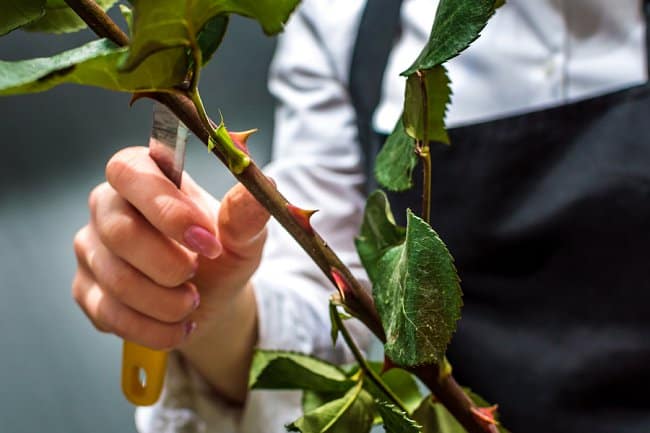
4. In order to additionally motivate the plant for root development, you can slightly “wound” or “nick” the end of the stem by lightly scraping it with your shears, slightly below the node.
This technique is called natural stem layering. Keep your blade subparallel with the stem and take off the top layer gently. The plant will rush to heal its wounded end, sending rooting and protective hormones which will help with a sooner and stronger formation of a quality root.
Which Part Of A Rose To Root?
In case you have left your cut stem on your workbench, walked away to the kitchen for a cup of tea, and came back unsure what part of the stem goes down into the rooting material – fear not. Take a good look at your stem and position it so that thorns point down and nodes point up.
Prepare the container
- Use a container of your choice. Medium-size is good, but the usual rule is the deeper the container, the better.
Mind that it is not transparent – in order to grow, roots need darkness, and they will grow away from the sunlight which is bad news for your rose, as it needs to develop its roots as wide and as expansive as possible.
It is good to reuse a thin plastic container if you have any at hand (for example, a paint container or a smaller bucket), however you can also purchase specialised starter containers at various garden stores.
Puncture three to four drainage holes at the very top of the container. They will serve for monitoring the water level. You can do this using a hole puncher or a hole-making tool of any kind.
Do not puncture holes at the bottom of the container as the goal right now is to keep moisture in and around in the system as much as possible and puncturing holes at the bottom will have some of the perlite escaping. - Fill the container completely with perlite.
Perlite is a rooting material. It is actually an expanded, fluffy form of volcanic rock that is baked at a high temperature. The attributes of perlite are generally good air porosity and high moisture content, which makes it a good transitional rooting product between water and actual soil.It is a slight irritant and a very dusty material, so you can protect yourself from breathing it in – best by putting it in a ziplock bag first. Pour a small amount of water into the ziplock with perlite and allow it to soak up on its own.
Perlite should reach a centimetre below the drainage holes you made. Make sure to slightly pat it down.
You can also use vermiculite, which is able to hold more moisture. According to the needs of the rose plant and the area you live in, you can also use a half and half of peat moss and sand or a half and half of vermiculite and peat moss. Some rose growers like vermiculite as it is able to hold water – however we don’t recommend it as it frequently contains traces of asbestos.
Neither perlite or vermiculite are strictly organic materials though perlite does have an organic label.
Fill the container with regular tap water to remoisten perlite until it starts slightly rising.
Add Rooting Hormone
- Prepare your rooting hormone. To prevent contamination, pour the hormone in a small, separate container. Rootone rooting hormones are recommended and thought to be the best on the market. They are marked by numbers, from number 1 to number 10, depending on the strength of the powder.
- Take your stem again and dip the wounded end of the stem into water. After that, immediately dip it into the rooting hormone you prepared, making sure that the end is well covered. Tap off the excess powder.
Planting
- Make a hole in the middle of the rooting material in the container with a pencil or a gardening stick of similar size.
- Place the stem inside of the hole, with the end that is covered in the rooting hormone facing down and going into the material. Gently push the stem all the way down to the bottom of the container.
- Gently tap and push perlite down and around the stem, patting it down snugly.
Cutting leaves
Remove about half of the leaves from the stem.
Stems don’t have a rooting system and because of this they lose water very quickly, through transpiration.
Leaving half of the leaves on the stem ensures that transpiration is prevented, and that the photosynthesis process in the plant can still go on uninterrupted and provide the developing rooting system withthe energy that it needs during this time.
Some gardeners claim that their cloning processes work out even without any leaves on the stem, but it is much safer to keep some of them. This is because different roses need different amounts of energy to develop roots.
Photosynthesis is the main way for any plant to get the needed energy and as it happens in the leaves, by removing them you risk your project failing.
Watering
Cuttings don’t have roots, which means that you have the responsibility of keeping the plant moist.
Aim to recreate the so-called “greenhouse effect”, where you create ample condensation and a nice and humid environment for the cutting.
You can assemble or pre-buy a misting system, however there are some good at-home solutions. This includes putting a plastic bag over the container with the cutting; you can also use a plastic bottle with the ends cut off.
Transparent blanket bags with zippers on top work particularly great – put the container with the cutting inside of it, spray the cutting and the inside of the bag abundantly with water and zip it up.
Remember to leave one side of the zipper open, so that air can still circulate and the plant can get oxygen.
How Long Does Rooting A Rose Take?
All in all, rooting can take anywhere from about six to eight weeks. You will know that the stem is ready to be taken out and repotted by lightly tugging on the plant. If the plant gives resistance and cannot budge from perlite that it is in, you will know that it has developed its rooting system which is firmly wound around the perlite. Usually you will be able to notice that the old leaves wilted, but you will also find that new ones are already sprouting.
A good tip is to write down dates on the container for an ease of keeping track of time passed between planting and the rooting process finishing.
Further Tips On Propagating A Rose From Your Wedding Bouquet
Make sure that the rooting process is not placed in full sunlight. A flowering rose needs just about all of the sunlight it can get, however the rooting process, due to the condensation and “the greenhouse effect” in place, should get some sun exposure.
It’s best to keep the cutting somewhere in a fair shade, where it is not directly exposed to heat and light.
Repotting Your Cutting With Roots!
Once you are confident that the stem has rooted, it’s time to repot your rose cutting!
For repotting, start feeding the plant after about three months since beginning the cloning process. It should be fed with liquid fertilizer, (of course we recommend organic)! initially at half strength. This can easily be increased to full strength later if the need arises and your rose gets bigger.
Depending on when you start the process of cloning, you will need to feed the plant throughout autumn and winter (during all of the months where there might be frost). Continue at least until May.
After you repot your rose plant, allow some time for it to bloom. You will watch it grow as big and strong as the rose bush it initially came from!
With your care and love, it will bloom as a beautiful reminder of your marriage, as a treasured heirloom, and a beautiful thing to look at! We hope you enjoyed this post on how to grow a rose from your wedding bouquet – you might also be interested in this post here.


